Onsite_PC_Solution_Windows_Update_logo

To maintain a secure and functioning system, it’s important to keep your system up to date.  Here’s how you can check for updates in Windows.

It’s easy to check

In Windows 7 or Vista, click the Start button and, in the search box, type Windows Update.

search_update

In Windows 8, drag the mouse to the right edge of the screen, click the search charm that appears, and type Windows Update.

Windows-8-updates-Metro-search-Windows-update-Solvusoft

Click Windows Update when it appears on the menu. You should then get a screen that looks like this:

windows-update-550x405

To review the updates that are available, you can click on the blue text representing the optional and important updates respectively.

important

The next screen allows you to check the boxes of the updates you wish to install.

screenshot-stage-1-updates-for-windows-8-1-rtm

We recommend that you install all the important updates and almost all of the optional ones. The optional update we counsel against is the Bing bar, which introduces a toolbar that you definitely do not need.

Once you have checked all the updates you want, click Install to go back to the previous screen where you click Install updates to get the process started.

Set Windows to install important updates automatically

You can check this setting on the same screen on which you installed Windows updates. Look to the left margin, and you should see a link to Change settings.

vista_windows_update_change

For Important updates, use the drag- down menu to Install updates automatically (recommended).

important_updates_auto

Installing important updates automatically will keep the critical security fixes off the back burner and readily available to ward off viruses.

For more about updates or other issues affecting your PC, consult your local IT professionals.

Read More


Fix Failed Windows 7 Update

Do you feel nagged for updates by Windows? As annoying as they may be, here are 3 reasons it’s necessary to keep your systems up to date.

Your reservations to install updates are understandable, especially when these updates can sometimes introduce glitches and even hijack your system for repeated restarts. However, no matter how annoying they can sometimes be, updates are essential for your Windows system to function optimally.

new-updates-available

1. Most Windows updates address security issues

Neglecting updates is a surefire way to compromise your operating system with infections that can slow down your system and even allow remote users to steal your private information. Moreover, the main reason Windows PCs succumb to malware and other viruses is that users neglect installing updates.  One particularly pernicious infection is the CryptoLocker virus  that allows remote attackers to ransom your personal folders.

OnsitePCSolution_Update_Security

2. Updates can fix bugs that prevent Windows from functioning properly

These bugs can sometimes slow down your computer or cause your system to freeze. Windows updates often have hotfixes that address these bugs. Bypassing the installation of these hotfixes puts the stability and performance of your system in jeopardy.

Updating Windows can patch bugs

3. Updates let you upgrade your existing Microsoft software or get new features

These features include Net Framework and Silverlight, which allow other programs, including non- Windows ones, to work properly. Software upgrades often add additional features to Internet Explorer and Microsoft Office, making them more user- friendly.

Note, that updates are no longer available for Windows XP. We therefore recommend upgrading to a newer version of Windows if you are running XP.  Now that you know the importance of updates, do you have the latest ones installed?

For more about updates or other issues affecting your PC, please consult your local IT professional.

Read More


Onsite_PC_Solution_How_To_Encrypt_Your_Hard_Drive

Do you ever worry about someone getting a hold of the data on your computer after stealing it from you?  With disk encryption, the information on your computer is unreadable without a key.

You may use encryption to protect specific directories or the entire hard drive. The latter is referred to as full disk encryption.

While there are many applications that perform full disk encryption, we recommend True Crypt. While some may lampoon this recommendation based on an announcement from its old source page, development of TrueCrypt has continued in Switzerland by a team committed not to compromise the software with legal limitations.

After downloading TrueCrypt from the new site, launch it normally if you have a disk burner, also known as a a CD/DVD-RW drive.  The disk burner will be required in later parts of the installation. If you do not have a disk burner, there is a workaround that will still allow you to proceed with encryption even though the program does not normally allow it.  For more on this workaround to allow to the program to launch without the disk burning requirement, consult the following article.

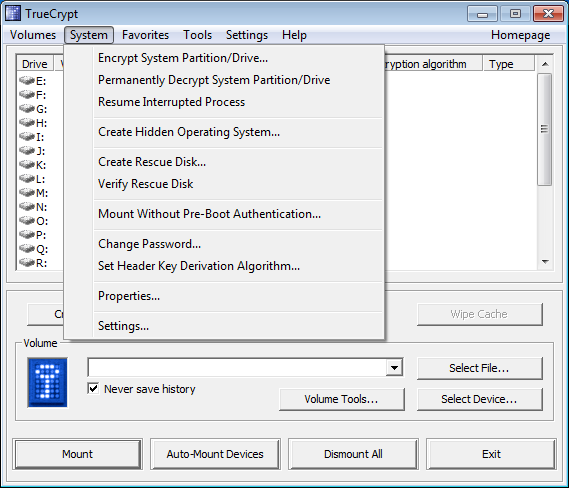
After you launch the program, click the System button at the top bar and select Encrypt System Partition/Drive.

1st_window

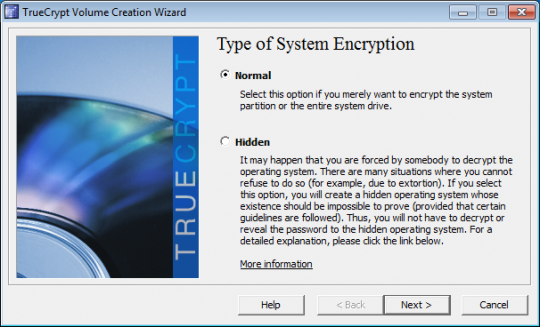
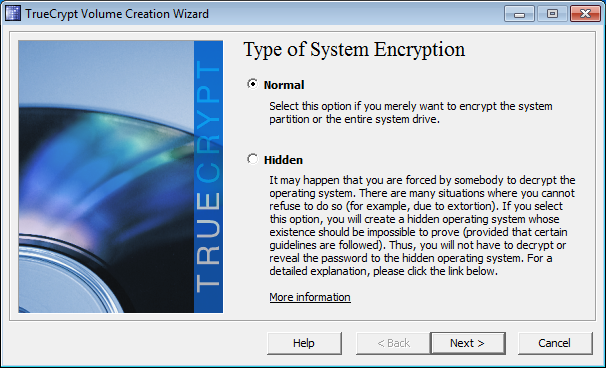
For Type of System Encryption, select Normal. Click Next.

Normal

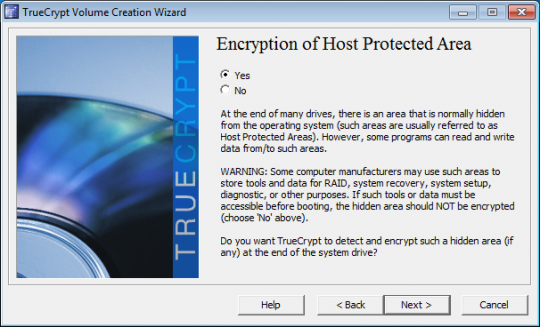
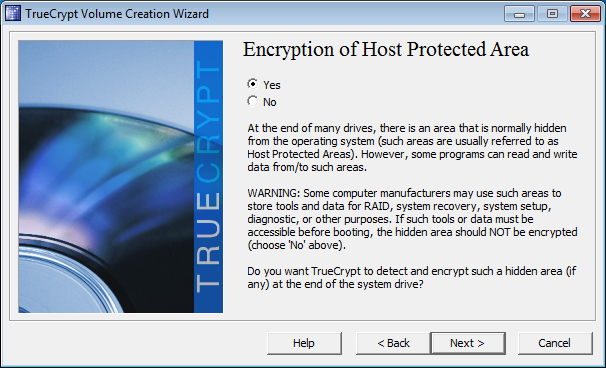
Unless you have a RAID driver or hidden partition at the end of your drive, Yes is the best option when you are presented with the Encryption of the Host Protected Area window.

encryption of the host protected area

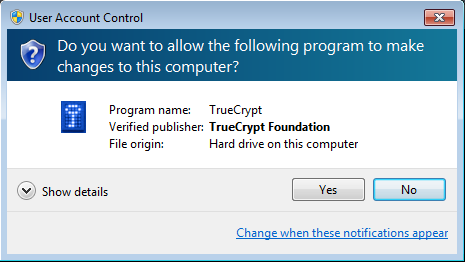
When you are asked if it is OK for TrueCrypt to make changes to the hard drive, click Yes.

changes to hard drive

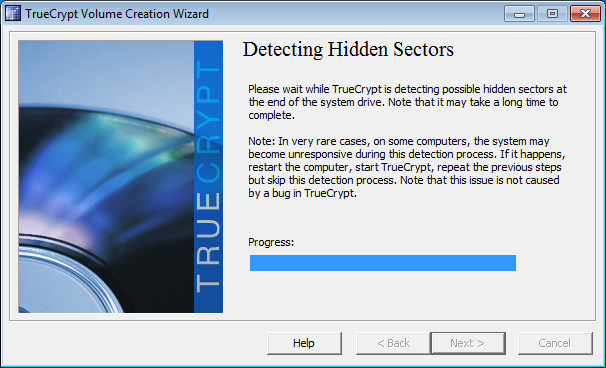
TrueCrypt will then see if there are any hidden sectors at the end of the drive. Click Next when it is finished.

detect hidden sectors

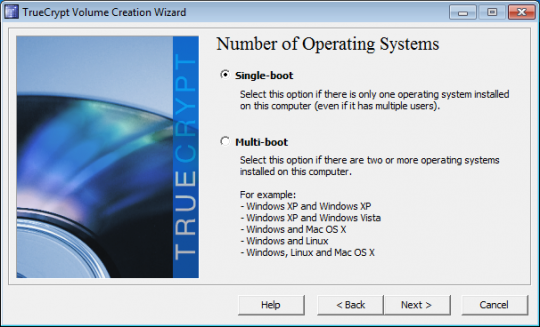
Click Next again after selecting whether the computer has a single- boot or multi- boot configuration. If you are running only one version of Windows and no other operating systems, you will choose Single-boot.

single or multiple boot

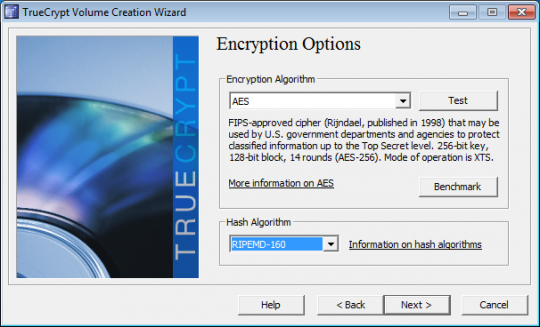
For the Encryption Options, AES is usually a good choice. And full disk encryption only supports the RIPEMD-160  hash algorithm. Click Next.

hash algorithm

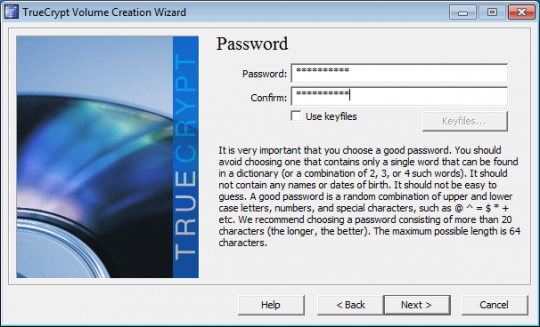
Choose a password for encryption. Choose a strong password of at least 20 characters. Click Next.

password

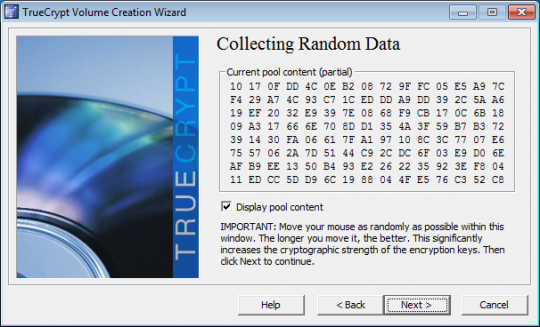
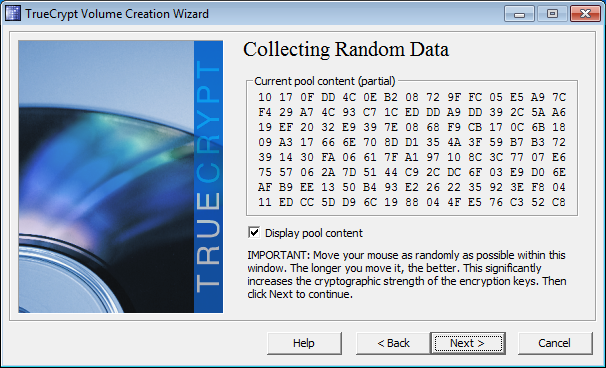
In the next window, make random movements with your mouse for about a minute. TrueCrypt will collect data from these movements. Click Next.

random

When User Account Control asks if it is OK for TrueCrypt to make changes to the hard drive, select Yes.

uac

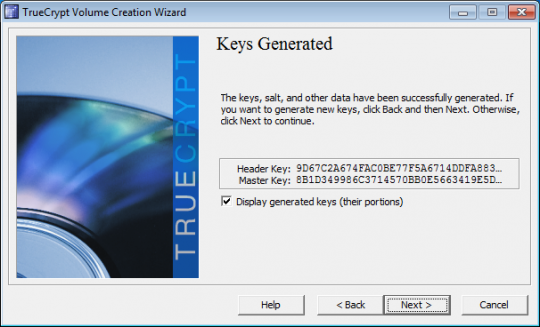
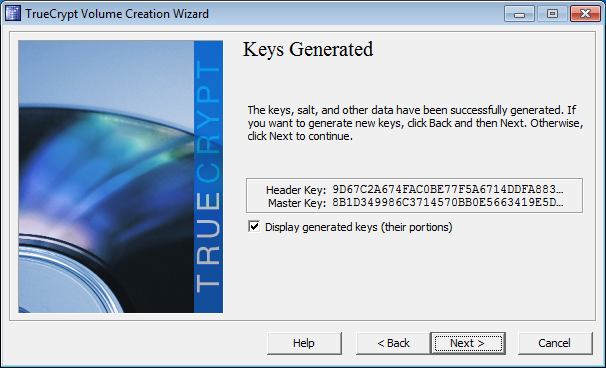
Click Next after TrueCrypt generates the encryption keys.

keys

TrueCrypt will then create the ISO image of the Rescue Disk that will be needed if something happens to your boot image. The ISO image will be created in your Documents folder.

burn disk

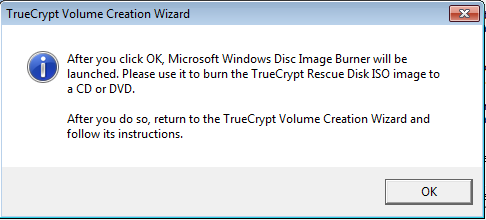
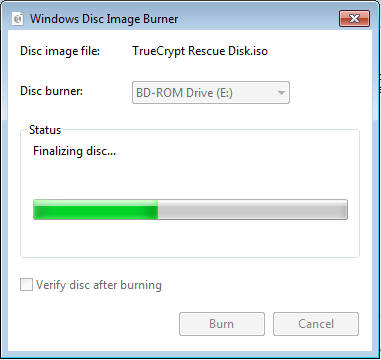
TrueCrypt will next launch the Windows Disk Image Burner to write this image to a blank CD ROM. Because you will need this disk to access your computer if your boot image becomes corrupted, TrueCrypt will not let you get to the next step until you burn and verify the disk. Choose the correct drive to burn the image to, load the blank CD ROM, and click Burn.

burn

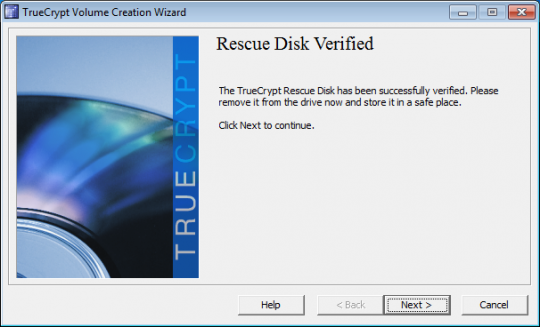
TrueCrypt will verify the disk after burning it. After it has been verified, click Next.

verified

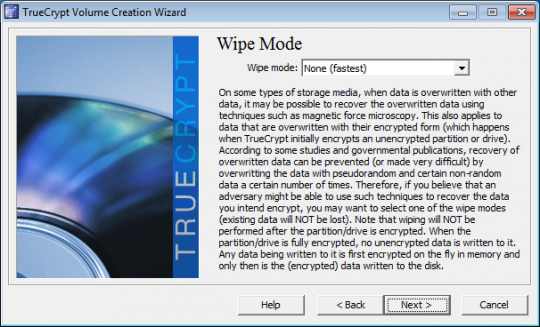
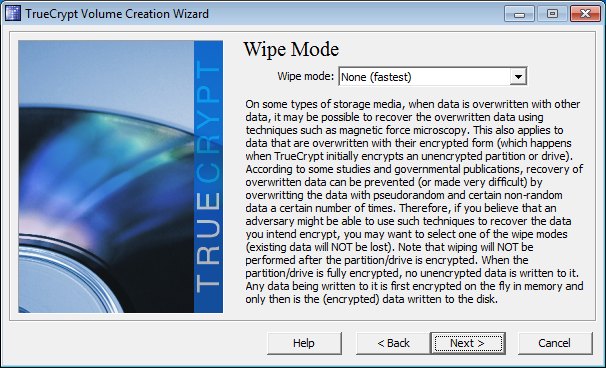
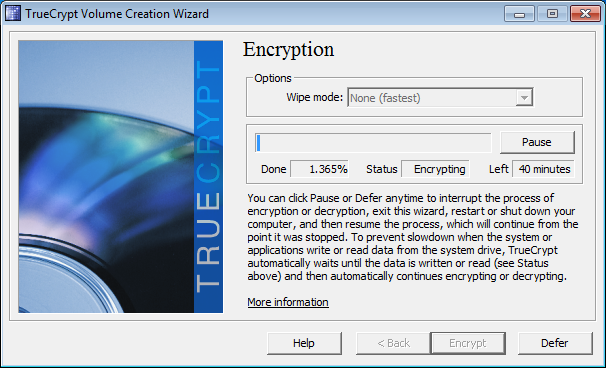
The Wipe Mode allows you to choose how to wipe all traces of previous data that was unencrypted. Typically these were files deleted before this encryption was started. If there was nothing sensitive on this computer that was deleted, click Next.

wipe mode

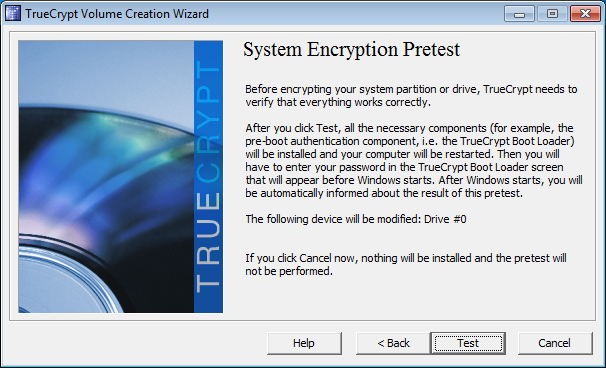
Next click Test to allow TrueCrypt to make sure everything is working.

test

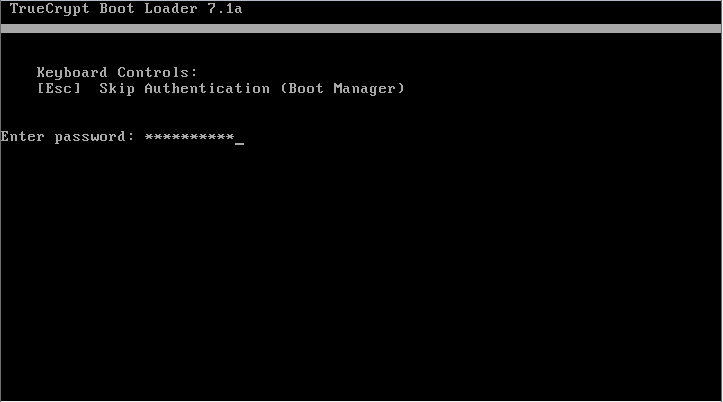
When TrueCrypt displays instructions telling you what to do when the system fails to reboot, it is advised that you print these out for reference. Then click OK. Click Yes to reboot your computer.

After the computer restarts, you will need to enter the encryption password.

reboot password

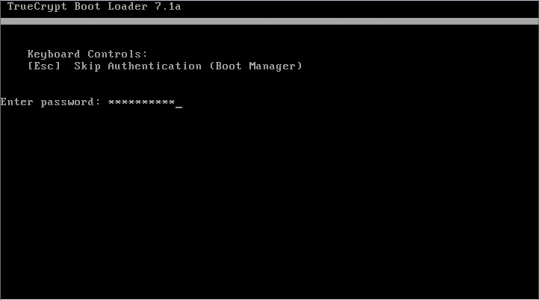
If you enter it correctly, you will be able to log into Windows. After you log in, TrueCrypt will start up automatically. Click Encrypt to start the encryption. Print the instructions showing what to do if the process is disrupted and click OK. When User Account Control asks if you want to allow TrueCrypt to make changes to the hard disk, click Yes. During the encryption, you may do other things on your computer. The encryption should take a few hours.

encryption

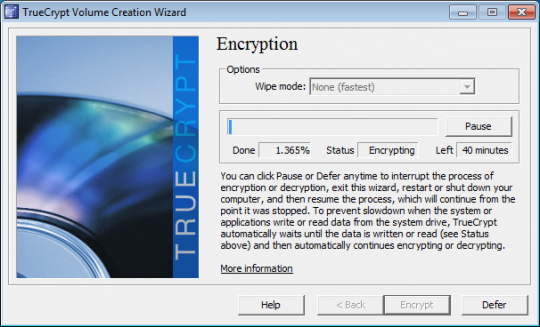
You may pause and defer the completion of the encryption to a later time. But until it finishes, the information on your computer will not be fully secure. When encryption is complete, click Finish.

For more information, consult your local IT professionals.

Read More


Should You Update Device Drivers

Any number of computer issues could be a sign that it’s time to update your device drivers. Are you unable to access your printer? Is your display giving you problems? Are you unable to connect to your router with your wireless adapter?

The problem may be with the device’s driver. Sometimes updating the driver will restore full functionality to the device.

The easiest way to update the driver is by accessing the Device Manager. You can get to the Device Manager through the Control Panel. In Windows 7 and Vista, the Control Panel can be reached by clicking the Start button and selecting Control Panel.

Article3-StartControlPanel

In Windows 8, you can select Control Panel by dragging the mouse prompt to the bottom right of the screen and allowing the charms bar to appear.

Windows-8-Charms-Bar


Click Settings and then click Control Panel.

how-to-find-the-control-panel-in-windows-81

If you have Windows XP, you should upgrade to a newer version of Windows. This is because XP is extremely vulnerable to viruses, as it cannot get the latest security updates. Nonetheless, you can get to Control Panel in XP by clicking the Start button and selecting Settings -> Control Panel or simply Control Panel.

In Control Panel, choose System and Security.

system-and-security

Next select System.

controlPanel.System.win7


If you have a different menu in Control Panel, you may be able to select System without going through System and Security. Under the Hardware tab, click Device Manager.

setup-usb-audio-windows-xp-hardware-properties

Enter a password or click to confirm that you wish to enter the Device Manager.

device-manager-control-panel

Click a + to expand a hardware category to find the device you want to update. Double click the device when you do find it.

update_Driver

Click the Driver tab, and click Update Driver. Follow the instructions. If you are prompted for a password or for confirmation, provide whichever is appropriate.

Sometimes this method fails to update the device driver. In this case, you will need to go to the device manufacturer’s website to find a driver to download and install.

Of course, not all hardware problems are caused by obsolete drivers. There could be physical problems with the device, configuration errors, or something else affecting the functionality.

For more information on this or other issues affecting your PC, consult your local IT professionals.


Read More


3 Steps to Removing Malware

Is your PC running slower or are you getting unwanted popups and ads?  You may have a malware or virus infection. Here are 3 ways to remove infections.

1. First, make sure that you have an infection.

Aside from Windows running slowly, one telltale sign of an infection is the computer running programs and processes that look completely unfamiliar.

Open Windows Task Manager. Right- click the taskbar and choose Task Manager from the menu.

Windows 8 taskbar

Select the Processes tab and click Memory or Mem Usage to to sort the running processes by how much RAM they use.

memory_usage

This should display the processes in descending order of memory usage. If it is in ascending order, you can click the Memory or Mem Usage tab again to view the processes with the largest memory on top. Paying special attention to these processes, look for ones with unfamiliar looking names.

strange_process

In particular, focus on high memory processes running in the task manager that have names with strange characters or symbols. Perform a google search on the peculiar looking processes to find out if they are legitimate.

If the search results  on the web point toward it being a malicious process,  you may be able to remove it as a startup program. Click the Start button, type msconfig in the search box, and click it when it comes up as a menu selection.

program-msconfig

After the system configuration utility loads, click the Startup tab to display the programs the system loads  when the computer starts up.

msconfig_startup_programs

Try to find the suspect process in the list of Startup Items and uncheck the box next to it to remove it as a startup process. It will be removed when Windows restarts.

2. Run a virus scan on your system

If you haven’t already done so, run a scan of your system with an antimalware or antivirus program.  Malwarebytes and Microsoft Security Essentials are highly recommended. First start with a simple scan. If this detects anything, remove the threats it detects. Next, run a full system scan.

If successive full system scans still detect malware, take note of the threats the scanner displays. Run a Google search on the threats to see if anyone has posted a successful method to remove the virus.

Detection of viruses on successive scans likely indicates that your antimalware program has been compromised. Accordingly,  downloading a new malware scanner is a good idea. Barring Malwarebytes, Bitdefender, Eset Online Scanner, and House Call are excellent suggestions.

But before running a scan with any of these antimalware programs, reboot the computer into Safe Mode with Networking. To do this, restart the computer and press F8 repeatedly when the logo of the motherboard manufacturer appears on the screen.

You will next see a black screen showing Advanced Boot Options. From this list select Safe Mode with Networking.

safe-modewithnetworking

This will boot into a simplified version of Windows that runs only necessary programs. Usually malware doesn’t load in safe mode. In safe mode, run your new malware scanner in advanced or custom mode. These modes are favored because you need to scan every directory on the computer. Be sure to perform a full scan on the entire system. This will take some time. You can probably watch a full length feature film while this occurs.

After this scan cleans up your computer, run another with a different malware program. Again, be sure to do a full system scan in Safe Mode with Networking. If the second scanner detects nothing, it is a good bet your system is purged of infections.

3. Run a live disc virus scan

If multiple scans keep detecting infections, you will need to reboot into a Linux live disc. While there are many live Linux distributions to choose from, Kaspersky Rescue Disk is highly recommended, as the interface is simple for Windows users.

For more assistance on this or other issues affecting your computer, consult your local IT professionals.

Read More