Onsite PC Solution Detect Bitcoin Mining Software

Does your computer seem to running much slower than usual? If so, someone may be using your computer’s processing power to mine bitcoins.

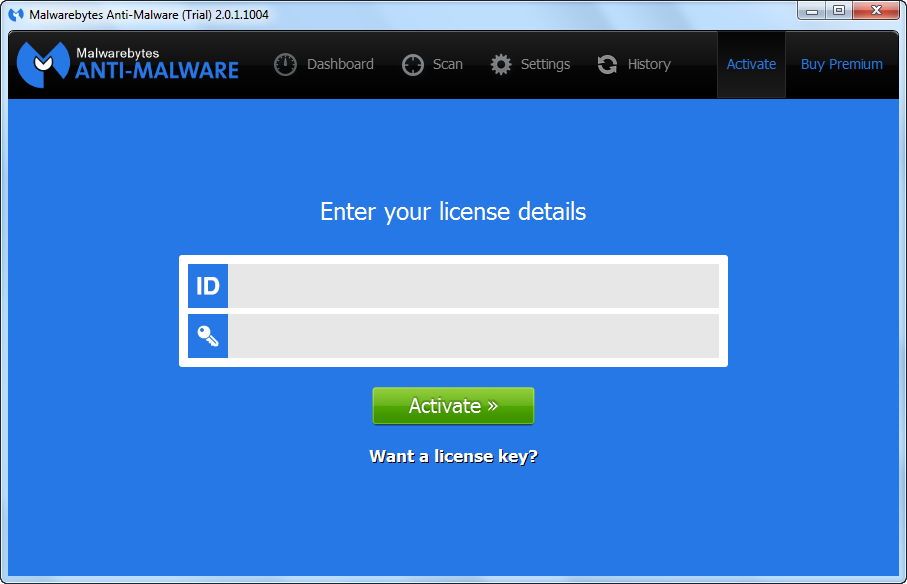
This is precisely what bitcoin mining viruses do, yet many of them can be detected with antivirus programs. Malwarebytes is highly recommended for this purpose. Whether your antivirus program is Malwarebytes which we recommend or something else, running a scan every so often will allay infection concerns.

Another way to detect bitcoin malware is by looking at the processes running on your PC. In Windows, hold down the Ctrl and Alt keys while pressing Delete. This will give you the following menu:

Starting-Windows-Task-Manager-CTRL-ALT-DEL

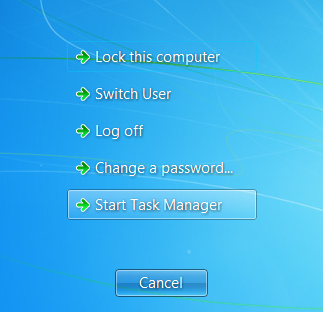
Select Start Task Manager from the list of options.

windows-task-manager

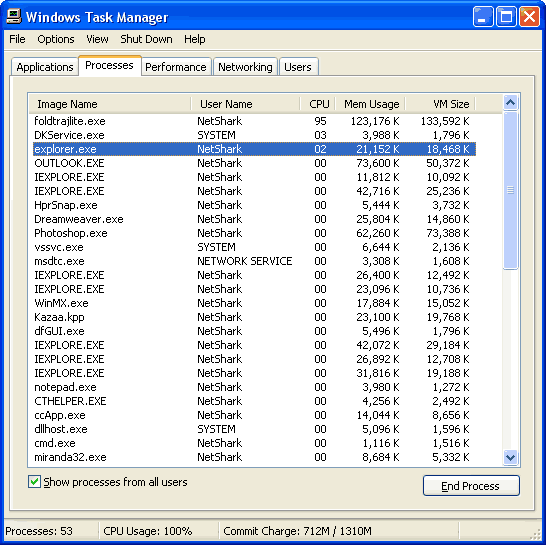
In the Task Manager, select the Processes tab as shown above. Check for any that have unfamiliar names, use a lot of memory or a high percentage of the CPU. You can sort the list by memory and CPU usage by clicking the CPU and Mem Usage  column bars at the top. Look up any process with an unfamiliar name on Google.

If the Google search reveals the name to belong to a rogue process, here’s how to remove it from your system.

In addition to being detected by antivirus scanners and causing your PC to use too much of its resources, bitcoin mining viruses can possibly make your computers use more electricity.

All managed services clients are automatically protected against processes that use too much CPU, including bitcoin malware.  Although bitcoin mining software on your PC isn’t likely to damage your files, you should always be running a backup to keep your files protected from catastrophic data loss.

For more information, consult your local IT professional.

Read More


Make Windows 8 Look Like Windows 8

Are you disappointed with the new unfamiliar Windows 8 or 8.1 interface? Here’s how you can make Windows 8 look like Windows 7.

Fortunately, there are ways to get Windows 8 to act like the Windows interface you know and love.

Probably the most off- putting aspect of Windows 8 is the lack of a Start Menu. With that in mind, the first order of business is installing a third- party  Start Menu program. We recommend Classic Shell. Aside from being free, it offers one of the closest approximations to the Windows 7 Start Menu obtainable from any third- party app. It can be downloaded here.

When setting up Classic Shell, go to the Start Menu Style tab and select Windows 7 Style.

w7-style

Under the Basic Settings tab, check the Skip Metro Screen box.

skip-metro-screen

This will ensure that you will go straight to the desktop without having to view the media saturated greeting screen that looks like this:

metro-screen

As annoying as that greeting screen is the charms bar shown below.

Windows-8-Charms-Bar

To disable this, download the free Winaero Charms Bar Killer. Launch the application. It will go to the notification area. Right click the program’s icon in the notification area and select Kill Charms Bar.

0407-winaero-kill-charms

This will disable all those annoying charms and allow your computer to behave like a desktop rather than a tablet.

For more information on this or other things affecting your PC, consult your local IT professionals.

Read More


OnsitePCSolution Transfer Malwarebytes License

Malwarebytes, widely acclaimed for its thorough ability to detect and purge malware from PCs, has two versions.  The premium version affords you with live protection, but it requires you to purchase a license.  What do you do if you purchase a new computer and Malwarebytes is registered on your old one?  Here’s a step by step guide to transfer your malwarebytes license.

Fortunately, there is a way to transfer your Malwarebytes Premium license to your new machine.

First, you must completely remove Malwarebytes from your old machine by downloading the mbam-clean.exe utility from here and by double- clicking it.  Allow it to run, and reboot the computer when it prompts you to do so.

On your new machine, go to the following link to download the free version of Malwarebytes. Run the program. After installation, click the activate tab at the top of right of the Malwarebytes console.

activate

If you do not have your ID or key, go to this url. Once there, enter the email address you used when you purchased Malwarebytes on your old machine, and click Next.

You should receive a reply email containing information for all orders processed with that email address. This should include your original Malwarebytes ID and key. Click Activate after you have typed in the ID and the key to activate the Malwarebytes Premium license on your new machine.

For more information on this or other issues affecting your PC, consult your local IT professionals.

Read More


OnsitePCSolution_MalwareBytes_Logo

Since its first release in 2008, Malwarebytes Anti-Malware has been one of the go-to tools for malware detection and removal.

It’s no wonder that its critical reception among computer journals has been stellar. Let’s take a look at what makes Malwarebytes synonymous with anti-malware for end users.

1. Installs easily and quickly with no reboot required

If you have to equip multiple computers with anti- malware software, installation ease and time is an important consideration.

OnsitePCSolution_malwarebytes-installation

2. The free version of the software is great at detecting malware than most paid versions of other programs

When you download Malwarebytes, you have the option of choosing between the free and the premium versions.

malwarebytes_home_page

While the free version is a manually activated scanner, the premium version gives you real time protection, allowing for a relatively worry- free web browsing experience.

As an added bonus, Malwarebytes allows you to try the premium version for 30 days before committing to purchase it. Simply check the Enable free trial of Malwarebytes Anti- Malware PRO option during installation.

3. Minimal system resource usage

It uses little CPU and memory compared to other applications such as Webroot and Spybot and especially less than programs like Norton and McAffee.  You will likely want to perform other tasks on your PC when your anti-malware application scans for threats.  This also means it doesn’t grind your PC’s progress to a snail’s pace.

Bonus: Detected the most malicious virus of 2013, CryptoLocker.

Malwarebytes was one of the few programs that could successfully detect early variations of CryptoLocker. This infection allowed criminals to ransom the personal files of hundreds of thousands of PC users worldwide.

If these reasons aren’t enough to opt for Malwarebytes as your personal defense against malware threats, consider the case offered by Techrepublic.

For more information on malware or other issues affecting your PC, consult your local IT professionals.

Read More


Onsite_PC_Solution_Outlook_Wont_Send

Are your emails sitting in your outbox but not going out? Do they not show in your sent folder? Moreover, are you getting the message “Cannot send the message.  530 Authentication Required.” ? Or does the error you’re getting look something like this?

outlook-2003-office365-530-5.7.1-error

The error code may be 530 instead of 503. Whatever the case, this is a common error in Microsoft Outlook. Your outgoing server is not allowing you to send messages without your mail client authenticating itself. This may be easily corrected without having to set up your mail account again.

In Outlook 2003, click Tools at the top bar and select Options.

2003_options

Choose the Mail Setup tab from the Options box, and click E-mail Accounts.

email accounts-Outlook2003

Select the email account you are trying to send mail from and click Next. To allow outgoing authentication in Outlook 2003, check the My outgoing server (SMTP) requires authentication box.

SMTP-authentication-Outlook2003-2

Leave the Use same settings as my incoming mail server box dotted.

In Outlook 2007, click Tools at the top bar, and select Account Settings.

Outlook_2007_Tools_Account_Settings_Cropped

In the Account Settings window, on the E-mail tab, select the appropriate email account and click Change.

modifyoutlook07-jpg

Click More Settings.

more_2007_settings1

This will put you on the General tab of the Internet E-mail Settings.

2007_internet_email_Settings1_general

Click the Outgoing Server tab. Check the My outgoing server (SMTP) requires authentication box.

outlook-2007-step6_require_authentication

Click OK.

In Outlook 2010, click File -> Account Settings.

outlook2010_file_account_settings

Click Account Settings again and select the E-mail tab.

EmailAccountOutlook2010

Select the email account with sending errors, and click Change. In the Account window, select More Settings.

2010_more_AccountSettings

In the Internet E-mail Settings window, click the Outgoing Server tab and click the My outgoing server (SMTP) requires authentication box.

2010_requires_authentication

Click OK.

In Outlook 2013, go to Tools -> Account Settings.

2013_Outlook-settings-Windows-7

Double click the email account you wish to correct. Next click More Settings.

how-to-configure-outlook-2013-4_more_Settings

For Internet E-mail Settings, select the Outgoing Server tab.

Microsoft_Outlook_2013_Account_Settings_More_Settings

Check the My outgoing server (SMTP) requires authentication box. Click OK.

If you still cannot send email after going through these steps, the problem may be with your outgoing mail server configuration. Logging into your account with your web browser and checking your mail server settings will likely give you the information you need to correct this problem.

For more information on this or other issues affecting your PC,  consult your local IT professionals.

Read More