Onsite_PC_Solution_IE_Exploit

A zero day exploit affecting Internet Explorer 6 through 11 has been discovered which allows an attacker to execute code and install malicious software.  Security firm Fire Eye has recently released the details of how this attack works.

Internet Explorer accounts for about 25% of the worlds browsers used to surf the internet. We will cover a high level summary and how you can protect yourself and your business.

How does it work?

The exploit works by loading a corrupted Adobe Flash SWF file in a webpage, which allows the attacker to modify data in memory, effectively bypassing Internet Explorer’s security and allowing any malicious software to be downloaded and installed.  This can include viruses, malware, keyloggers, bitcoin mining software, fake anti-virus programs among other destructive software.
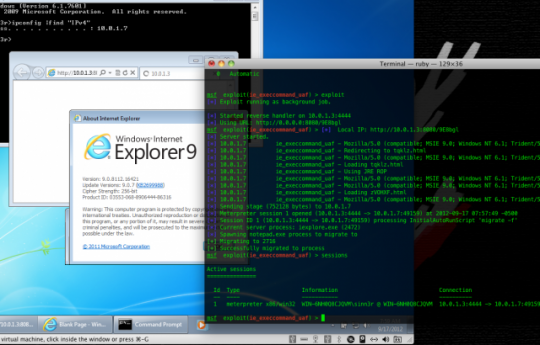
Rapid 7 shows an attack on a Windows 7 system using this exploit.

Rapid 7 shows an attack on a Windows 7 system using this exploit.

The exploit can be used on any version of Windows that runs IE 6, 7, 8, 9, 10 or 11, which means this is the first time that running a newer version of Windows does not protect you from an exploit.

What can I do to protect myself?

Microsoft has already started rolling out an update to patch the security bug, so be sure to keep your operating system up to date.  It is also recommended that you install Microsofts EMET 3.0, which brings better security protection especially for older Windows operating systems.

As always, we recommend running more secure and light weight web browsers such as Chrome or Firefox and avoiding Internet Explorer unless absolutely necessary.

All Onsite PC Solution clients with monthly maintenance plans will automatically be patched during their next monthly maintenance cycle.

For more ways to protect your business and home computers, contact your local IT professionals.

Read More


Onsite PC Solution Transfer Files Between Windows Systems

Did you just buy a new Windows laptop or desktop computer? You will probably want to bring all of your files with you too. With Windows Easy Transfer, you can transfer Windows files and settings from one Windows operating system to another.

Note that  Windows Easy Transfer will not transfer files from a 64-bit version of Windows to a 32-bit version.

Also, you must open this program with an administrator account.

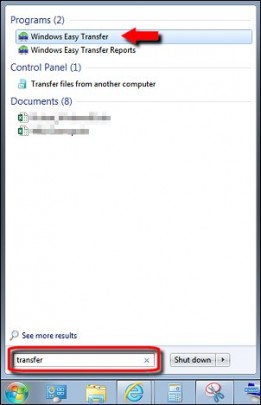
To open Windows Easy Transfer, click the Start button on your old computer and type Easy Transfer in the search box. In the list of results, click Windows Easy Transfer.

start_easy_transfer


To transfer files and settings from Windows XP to 7, please refer to the following article.

 If prompted for an administrator password or confirmation, enter the password or confirm the launch of the program.

When the wizard opens, follow the step by step instructions to transfer your files.  Then perform the same steps on your new computer.

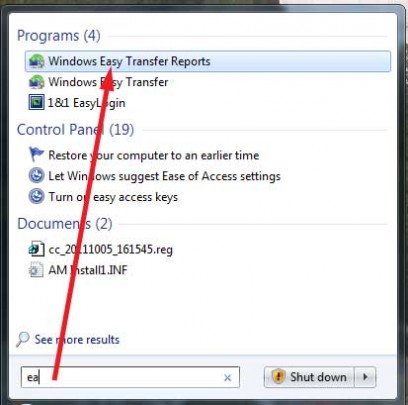
To view a report of the transfer, click the Start button, type Easy Transfer Reports. In the list of results, click Windows Easy Transfer Reports.  

start_easy_transfer_report

If prompted for an administrator password or confirmation, provide the password or issue the confirmation.

If you are moving files from a windows system to a non windows system such as Linux, Mac or Chrome, you will want to copy all of the files in your C:\Users\<username> directory using an external drive or by copying it over the network.

For more information please consult your local IT professional.

Read More


Onsite_PC_Solution_Transfer_Files_Windows_XP_to_7

Since Microsoft has ended support of Windows XP and it has become increasingly dangerous to continue running XP, many people have purchased new Windows 7 systems. If you replaced your Windows XP system with a new computer you will want to move your Windows XP files and settings too.

This can be accomplished with a USB drive and Windows Easy Transfer.

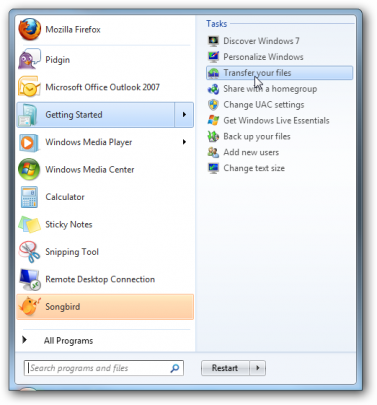
First, on the Windows 7 computer, click the Start button, select Getting Started, and Transfer your files.

transfer_your_files


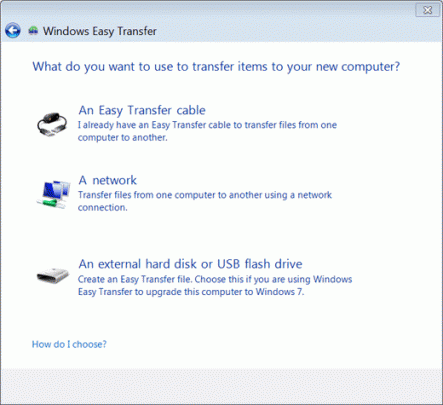
When asked What do you want to use to transfer items to your new computer?, select  An external hard disk or usb flash drive.

what_do_you_want_to_use_to_transfer


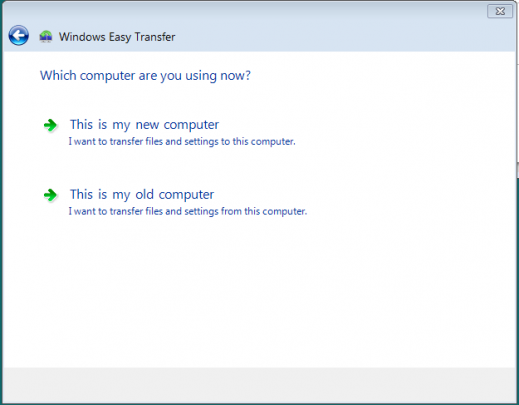
Next select This is my new computer.

this_is_my_new_computer

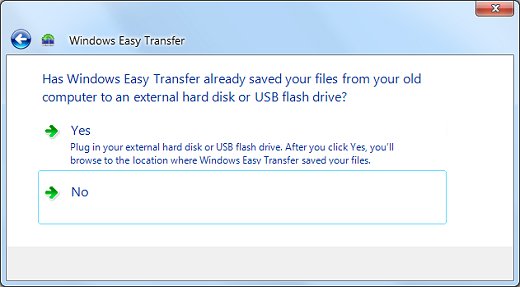
When asked Has Windows Easy Transfer already saved your files from your old computer to an external hard disk or USB flash drive?, answer No.

has_WET_already

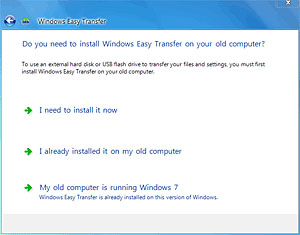
On the next screen, select I need to install it now if you haven’t installed Windows Easy Transfer on your XP computer.

i_need_to_install_it_now

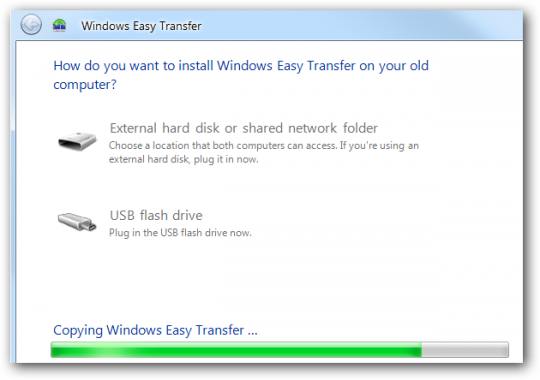
Select External hard disk or shared network folder to copy the program to your USB drive.  If you have an external USB drive, you need to use the External hard disk option.

external_hard_disk_or_network


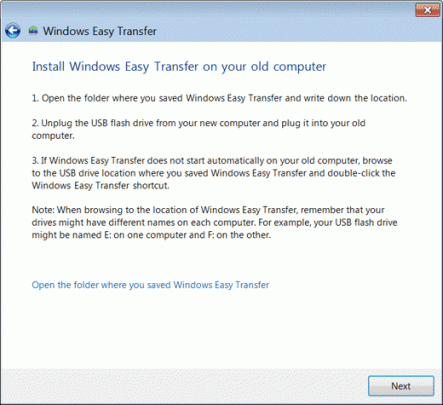
Next Windows Easy Transfer must be installed on the XP machine. Follow the instructions that appear in the next window. The instructions will tell you to move over to your old computer.

install_WET_on_your_old_computer

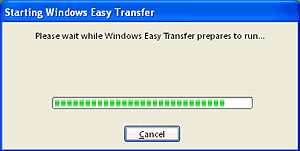
After attaching the USB drive to your old computer, launch Easy Transfer from the saved location on the USB. While the program prepares to run, a window with a progress bar appears.

please_wait_for_WET

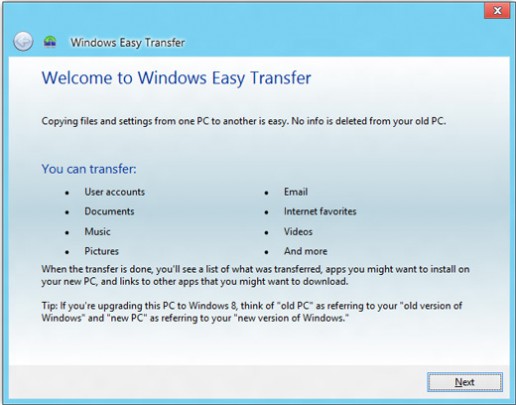
Next, after reading the instructions on the welcome screen, select Next.

welcome_to_WET

Use your USB to transfer files by choosing An external hard disk or USB flash drive. 

what_do_you_want_to_use_to_transfer

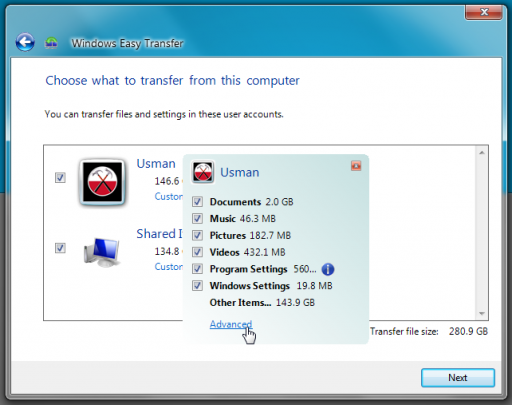
Next you can select which user accounts and settings, along with a list of accompanying files to save.

choose_what_to_transfer


Selecting Advanced gives a more detailed way to save files.

advanced_save

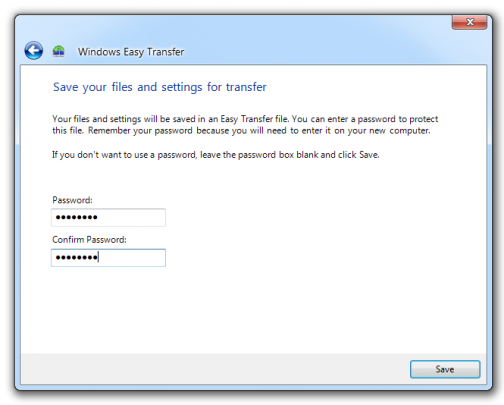
If you so desire, you may password protect the backup.

Windows-easy-transfer-password-setting

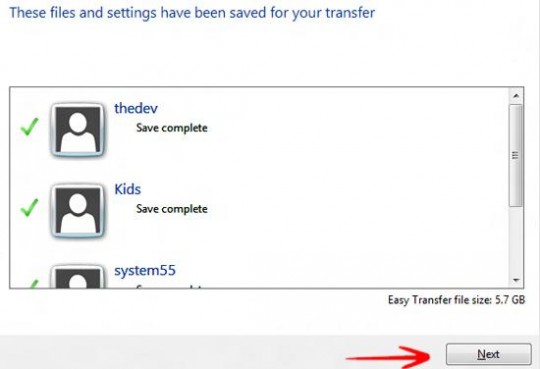
After choosing Save, click Next, safely remove the USB, and plug it into the new machine.

file-settings-saved

Launch Windows Easy Transfer on the Windows 7 machine and click Yes when the following window appears:

has_WET_already


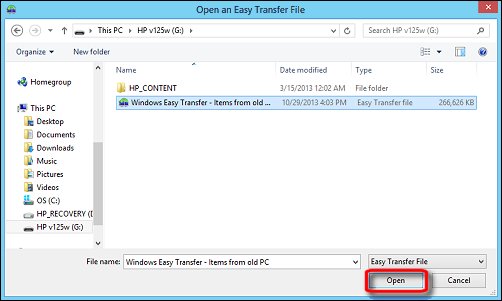
After the file explorer opens, use it to move to the location of the backup on the USB drive.

open_WET_file


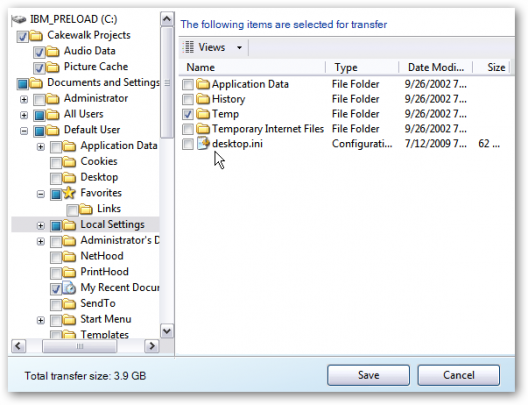
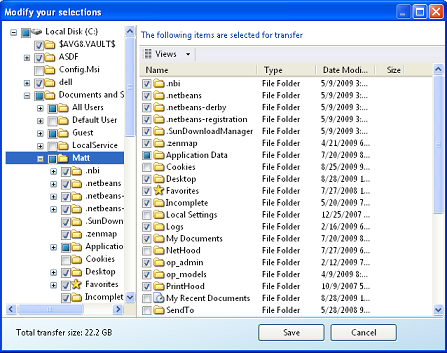
You can restore the entire backup or pick specific files and folders to restore. Click Save to begin the transfer.

save_to_transfer

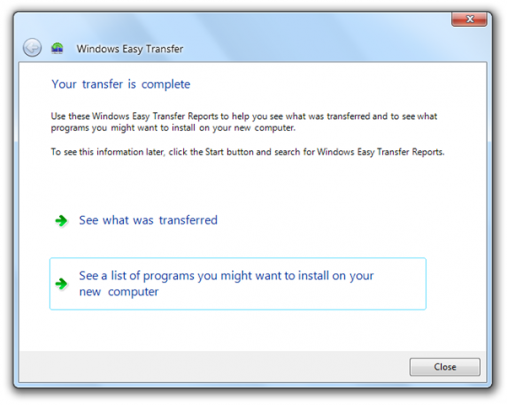
When the transfer is complete, you can view a report of it, as well as suggestions for additional programs to install.

your_transfer_is_Complete


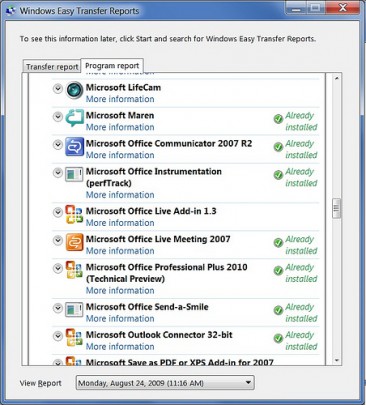
The additional programs available for installation can be viewed under the Program Report tab.

program_report


Not all programs and settings will transfer to Windows 7, but this is one of the most seamless processes for transferring compatible program settings and files.

For more information please consult your local IT professional.

Read More


Onsite_PC_Solution_Windows_Update_logo

A recent Windows 7 update meant to make the transition from Windows 7 to Windows 8 easier has been causing systems to freeze up according to many user accounts online.  Microsoft released this update on April 22nd as KB2952664. There have been updates in the past which have caused the operating system to lock up, freeze or malfunction such as this Microsoft Security Essentials update for Windows XP which was pulled by Microsoft after user’s started having issues.


Although the patch has been labeled as an “important” update on some systems and “optional” on others, it isn’t necessary to keeping Windows 7 operating properly.  It is best for users to hide this update completely.

If you haven’t installed it yet, here’s how you can avoid this update and avoid issues with your Windows 7 System:

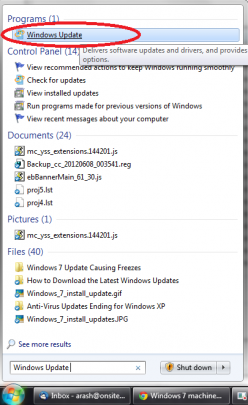
Go to Start and type “Windows Update” without the quotes in the search box.  Click on Windows Update at the top of the list:

Onsite_PC_Solution_Start_Programs


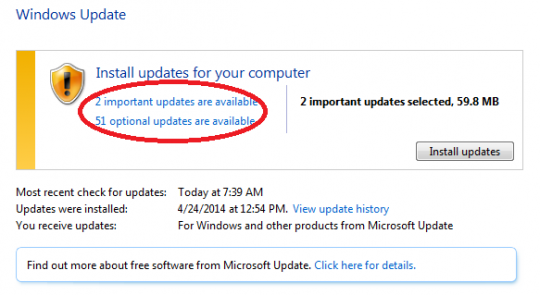
You will need to look in both the Important Update and the Optional Updates for this patch:

Onsite_PC_Solution_Windows_Update


Search for the patch with id KB2952664 in the updates list, right click on it and select Hide Update:

Onsite_PC_Solution_Find_KB2952664


If you have already installed the update, or don’t see the update listed in the Important Updates or Optional Updates section, you may need to uninstall it manually.

You can do this by going to Start -> Control Panel -> Programs and Features -> View Installed Updates.  Then find the patch with ID KB2952664, right click on it and select uninstall.  Then follow the steps above to hide it from future updates.

All monthly maintenance clients will have this done for their systems during their next update cycle.  For further support or questions about this issue, contact your local IT professionals.


Read More


Onsite_PC_Solution_Windows_Performance

Has Windows slowed down significantly since you first purchased your machine?  Here are 3 steps to help speed up your Windows 7 or 8 system.

1.) The Performance Troubleshooter automatically finds the culprits that are slowing you down

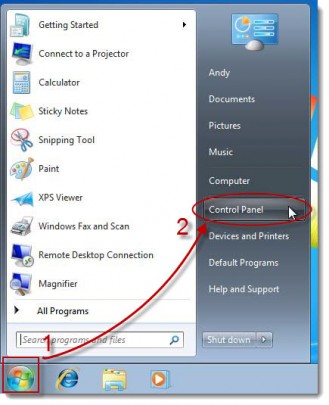
To open the Performance Troubleshooter, click the Start button and then click Control Panel.

start-control-panel-windows71


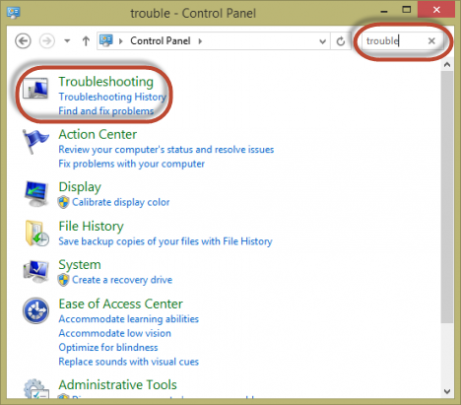
Type troubleshooter in the search box and then click Troubleshooting.

tnp6


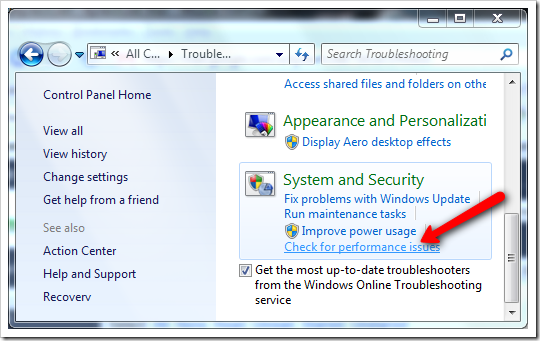
Click Check for performance issues under System and Security.

check_for_performance_issues

Click Next. Windows will attempt to pinpoint the issues that are slowing it down.

2.) Deleting programs you never use to help speed up your system

This can include manufacturer’s programs, as well as ones you installed or didn’t mean to install. Utility programs are notorious for dragging Windows down. These include virus scanners, backup tools, and disk cleaners.

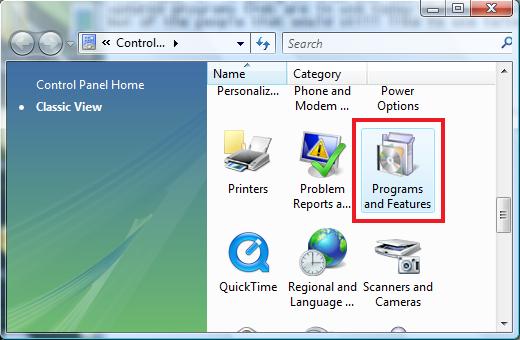
To uninstall a program, click Control Panel from the Start button.

Next select Programs and Features.

programs_and-features


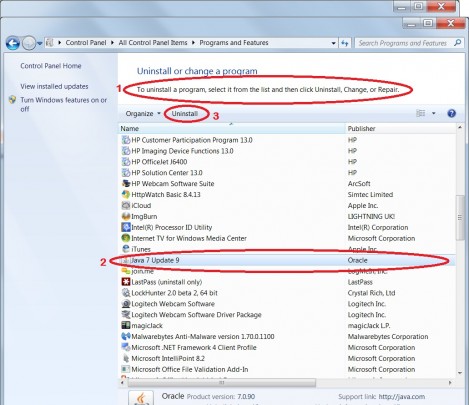
Select the program you want to get rid of and click Uninstall.

7-control_panel-all_control_panel_items-programs_and_features


3.) Limit the number of programs that run at startup

Programs that run in the background that you don’t need waste memory and slow down the startup time for Windows.

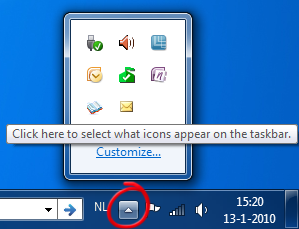
You can find many of these programs in the Notification Area of the Windows taskbar. This area is at the bottom right of the screen.

windows7-notifications

By clicking the up arrow, you can see the hidden icons, showing some of the programs that are running in the background.

Other background programs can be detected by AutoRun for Windows.

By un-checking a box next to the undesired startup program, you can prevent it from running when the computer starts.

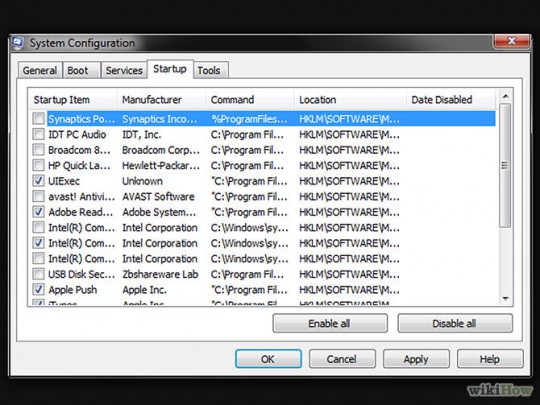
Another way to examine and remove startup programs is with the System Configuration Tool.  To open this, click the Start button, type msconfig in the search box, and click the the same- named icon.

images

Click the Startup tab and sort through the programs to find the ones you want prevent from starting.

670px-Make-a-Windows-Computer-Start-up-Faster-Step-13

If you are not sure whether it is safe to remove the program, perform a Google search of the program name. There is a possibility that the program you are removing is an essential process or one that enhances the functionality of the operating system.

For more information on speeding up a sluggish computer, consult your local IT professionals.
Read More